I recently had a conversation about data masking, specifically to replicate the same logic offered through a Tableau user-function, ISMEMBEROF. To my surprise, I found that there wasn't much information on how to achieve this in Power BI. While there are some blogs and videos available, they didn't provide a complete solution for what I was trying to accomplish.
To address this, I've simplified my example and present it as an article below.
What is Data Masking?
To make sure we are aligned, data masking is a security technique used to hide the values of a column or row in a dataset. For instance, if I have a table with multiple rows and columns, and one of the columns is "Bank Account Number," data masking can duplicate this column with the data hidden based on specific conditions. The original column is then hidden from view. This ensures that only the bank account numbers relevant to the signed-in user are displayed.
What Data Masking is Not
In Power BI, data masking is not the same as Row Level Security (RLS) or Object Level Security (OLS). Many sources suggest implementing data masking with RLS or OLS, but I believe it goes against the purpose of data masking. Remember, data masking doesn't hide entire rows or columns, it only hides specific values within each.
So, what is the Requirement?
The requirement is to implement data masking in Power BI so that managers can see the home addresses of customers within a specific division, but only if those managers belong to a designated security group – think AD/Entra Groups. However, not all managers should be able to view customer addresses, even if they are assigned to the division. Sometimes, managers may temporarily oversee a division. Here's an example:
- If a manager oversees Division 1 and belongs to the security group "Group 1," display customer addresses.
- If a manager oversees Division 1 but is not part of the security group "Group 1," display "Confidential."
Setting the Scene
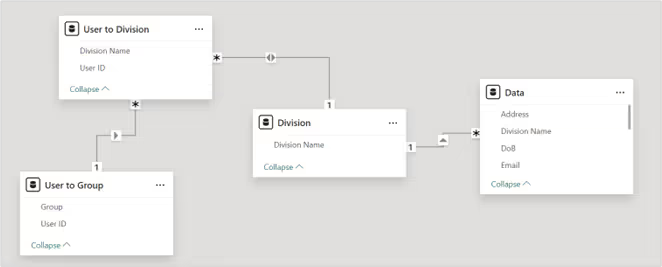
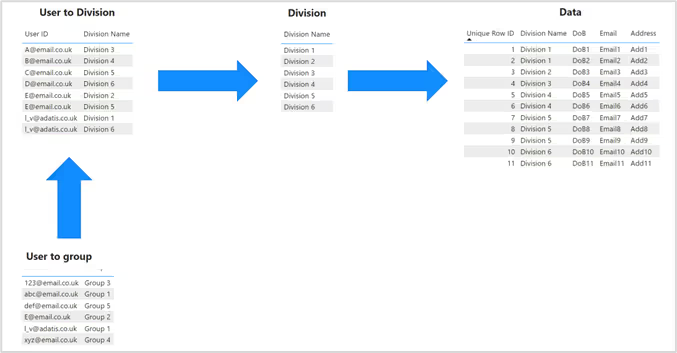
Below you will find two screenshots. One of the data model and the other showing the actual data in each of the tables. Once again, this is a cut-down version for purposes of this article.


Desired Outcome
The desired outcome is to display an address only if specific conditions based on the user's group memberships and the division are met. The conditions are as follows:
- If the user is in Group 1 and the division is "Division 1".
- If the user is in Group 2 and the division is "Division 2".
- If the user is in Group 3 and the division is "Division 3".
- If the user is in Group 4 and the division is "Division 4".
- If the user is in Group 9, regardless of the division.
If any of these conditions are satisfied, the actual address is shown, otherwise display “Confidential”.
To further explain this, consider a manager with the email E@Email.co.uk - you can also see this user in the sample data provided above. As a manager, they are assigned to Division 2 and Division 5. This means they should be able to see all rows and columns for these two divisions. However, they are only temporarily overseeing Division 5, so while they should see all performance data, confidential information like addresses should be hidden.
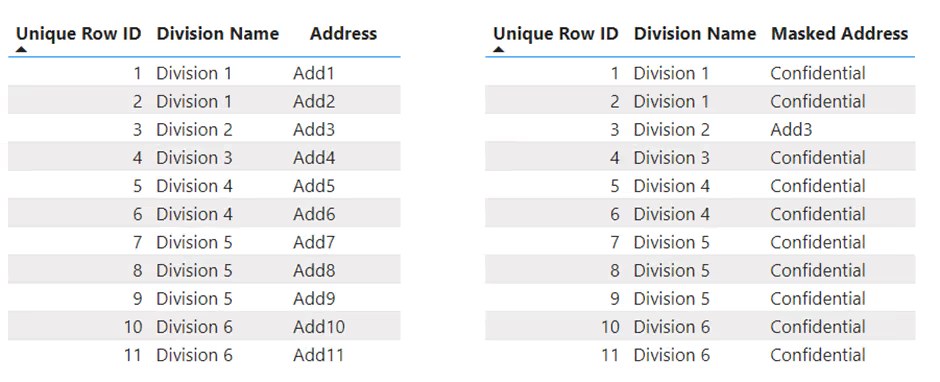
This is why we are not using RLS (Row Level Security) or OLS (Object Level Security), as these would hide everything. From the data provided, we see that the manager with the email E@Email.co.uk belongs to Group 2. Therefore, the expected output should be as follows. Even though they are assigned to both Division 2 and Division 5, they can only see the actual addresses for Division 2, while the addresses for Division 5 (and all other divisions) are masked.

How To Achieve Desired Outcome?
To achieve the desired outcome, I wrote the below measure. I have broken down each section of the DAX for the measure "Masked Address" to explain the logic.
Stage 1: Identify Current Signed in User
This variable captures the email of the current user logged into Power BI. This is important for determining what data they should have access to. For example, if the user is signed-in is Laz@example.com, then CurrentUserEmail will be “Laz@example.com”.
Stage 2: Get the Current User's Divisions
This variable retrieves the list of divisions associated with the current user from the 'User to Division' table. This helps in determining the specific divisions the user oversees. Keep in mind, a single user can be assigned to multiple divisions. For example, if "Laz@example.com" belongs to "Division 1" and "Division 2", then CurrentUserDivisions will contain "Division 1" and "Division 2".#
Stage 3: Get the Current User's Group
Similiar to previous, but for groups. So, this variable retrieves the list of groups associated with the current user from the 'User to Group' table. This part is necessary for applying group-based access rules. For example, if "Laz@example.com" belongs to "Group 1", then CurrentUserGroups will contain "Group 1".
Stage 4: Define Group Membership Variables
These variables check if the current user belongs to specific groups. This helps in conditionally displaying data based on group membership. Initially, I created these group membership checks directly in the RETURN statement, but that looked messy, so kept them seperate. For example, if Laz@example.com belongs to "Group 1" and "Group 3", then IsInGroup1 will be TRUE, IsInGroup3 will be TRUE, and the others will be FALSE.
Stage 5: Apply Conditional Logic
This final stage implements the logic to display either the actual address or "Confidential" based on the user's group membership and the division. For example, if "Laz@example.com" is in "Group 1" and "Division 1", the address will be shown. If "Laz@example.com" is in "Group 2" and "Division 1", the result will be "Confidential".
Some additional things to consider, you should hide the original customer address column. Additionally, you may need to combine this with Object Level Security (OLS). Also, this approach relies on the mapping tables, so try to minimise manual work by identifying a business area that can maintain these tables or finding an existing mapping table that is regularly updated as part of a business process.


